- View a selection of all-sky image surveys directly from your web browser with no need to install extra software.
- Explore the sky interactively by panning, zooming and dynamically switching between surveys.
- Find almost any deep-sky target by common name or catalogue number (Messier, NGC, ICC, etc.), or choose from a list of popular imaging targets.
- Go to any location using Right Ascension and Declination coordinates.
- Overlay the sky with a reticule which reproduces the field of view of your camera and telescope / lens.
- Display multiple reticules at once to compare the fields of view of different camera and telescope / lens combinations. Great for evaluating prospective investments in new equipment!
- Reposition the target and rotate the reticule to work out the best way to frame your image, as well as changing the reticule colour to suit different sky backgrounds.
- Arrange multiple reticules on a single target to plan a mosaic.
- Annotate the reticule with the field of view dimensions, pixel scale and the resolving power of your scope/lens.
- Set the reticule size by directly entering the dimensions of your field of view if you already know them, or calculate them if you don't.
- Calculate field of view dimensions using camera chip or pixel dimensions, resolution and the focal length of your scope or lens.
- Or choose from a database of hundreds of popular telescopes, astronomical CCD and DSLR cameras.
- Determine the effect of adding a Barlow lens or focal reducer/field flattener on your set-up.
Read on for full instructions.
ContentsInstructions
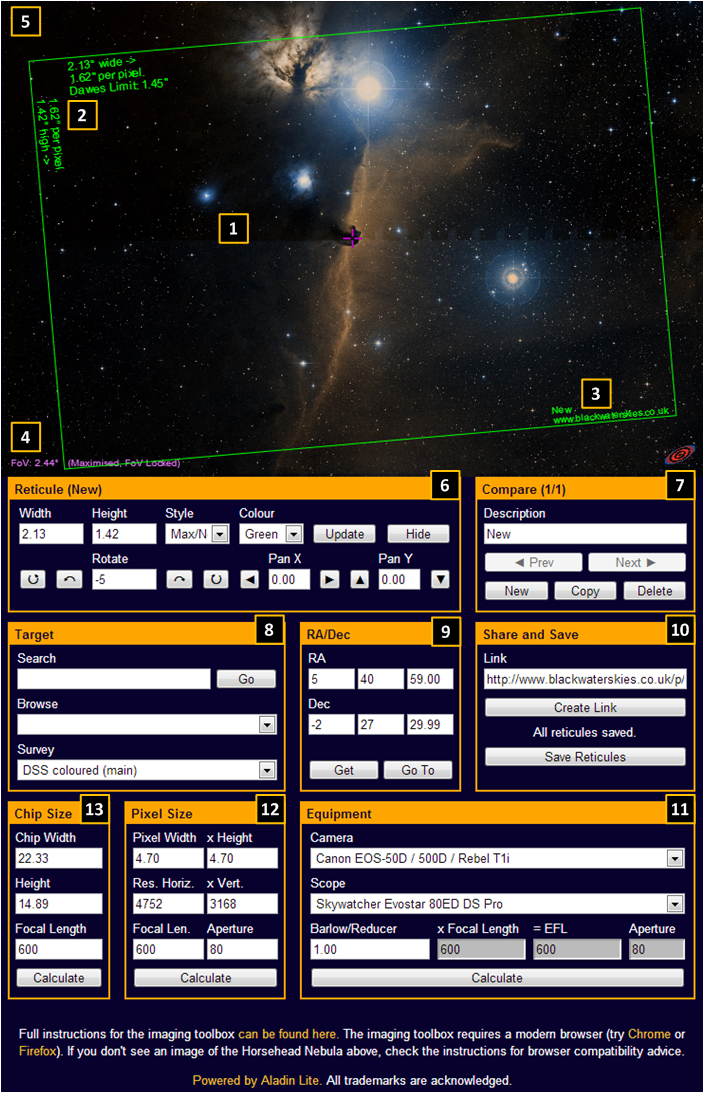
The imaging toolbox consists of an interactive image canvas and a series of easy-to-use forms which are explained in the numbered sections below corresponding to Figure 1.

Figure 1
1. Image: The interactive image is powered by Aladin Lite. You can pan around the whole sky by clicking and dragging your mouse anywhere on the image. You can also zoom in and out using the mouse-wheel or using the + / - buttons on the image. (When the current field of view reticule is displayed, zooming is limited to a field of view of less than 90 degrees to avoid distortions due to map projection. When the current reticule is maximised, zooming in and out is not possible).
2. Field of View Reticle: The field of view of your camera and telescope / lens combination is shown by the field of view reticule (the green rectangle). When maximised the reticule is annotated to show:
- The size of the field of view in degrees, both horizontally and vertically.
- The pixel scale of your image in arc seconds per pixel, both horizontally and vertically (if known).
- The Dawes Limit (maximum theoretical resolving power of your telescope or lens) in arc seconds if known.
3. Reticule Description: The description of the reticule, as set by you using the 'Compare' box (see below).
4. Aladin Lite Field of View: The horizontal field of view covered by the whole image canvas. Not to be confused with the field of view of the reticule.
5. Pointer Coordinates: The coordinates of the mouse pointer are displayed here when you mouse over the image. Note that ICRS coordinates are displayed. For most practical purposes, ICRS coordinates are close enough to normal J2000 RA/Dec coordinates as makes no difference. (The pointer coordinates are hidden when the current reticule is maximised).
6. Reticule: Here you can control the current field of view reticule. The description of the currently selected reticule is displayed in the header of this section.
- If you already know the width and height of your camera and scope / lens combination, you can enter them in the 'Width' and 'Height' boxes in decimal degrees and the reticle will re-size to match when you hit 'Update'.
- Click the 'Show' button to display the reticule. If you make any further changes to the settings here, click the 'Update' button to apply them to the current reticule.
- Click the 'Hide' button to remove the current reticule.
- To rotate the current reticule, click the 'Circular Arrow' buttons to rotate it in one or ten degree increments. Alternatively, type the desired rotation angle in the 'Rotate' box and hit enter. If the reticule is maximised, the image canvas will zoom automatically to keep the whole reticule in view. (You can rotate between -180 and +180 degrees, with zero degrees being 'up the page').
- To pan the current reticule use the 'Arrow' buttons to move it horizontally or vertically relative to the centre of the image canvas in 0.05 degree increments. Alternatively enter the X offset (horizontal) and Y offset (vertical) in the 'Pan X' and 'Pan Y' boxes. (Positive values move the reticule right or down, and negative values move it left or up).
- Change the display of the current reticule using the 'Style' box. Options containing 'Max' maximise the current reticule keeping it on screen, whereas 'Zoom' enables free zooming of the image canvas. Options containing 'Notes' annotate the reticule with its size in degrees, pixel scale and resolving power. (When a reticule is displayed, the maximum zoom extent is 90 degrees in all cases. This is in order to prevent distortions caused by projecting the sky survey on screen).
- You can change the colour of the reticule to make it more visible against different sky backgrounds or when comparing several reticules by choosing from the 'Colour' list.
- Enter a description of the current reticule in the 'Description' box and hit Enter. The description is displayed at the bottom right of the reticule. (The description can contain a maximum of 20 characters).
- Use the 'Prev' and 'Next' buttons to select each reticule in turn. As you select a reticule, its details are displayed in the other sets of controls automatically. (Selecting a reticule does not automatically display it; use the 'Show' and 'Hide' buttons to control the visibility of the current reticule).
- The 'New' button creates and selects a new reticule with the default values and displays it.
- The 'Copy' button creates a copy of the currently selected reticule, selects and displays it.
- The 'Delete' button deletes the currently selected reticule. (If this is the only reticule, a new reticule is automatically created and displayed with the default settings).
- Search by name or catalogue number. Simply type the common name of an object (e.g. Horsehead Nebula) or the catalogue number in to the 'Search' box (e.g. M51, IC3393 or NGC393), click the 'Go' button and Aladin Lite will try to locate it. This uses the CDS Sesame name resolver service and should be able to locate most objects. (Solar system objects such as planets are not included in deep sky surveys as they're constantly on the move!)
- Alternatively, you can choose a popular object from the 'Browse' list.
- The 'Survey' list enables you to select from a list of deep sky surveys supported by Aladin Lite. (The default DSS survey is probably the most useful. Bear in mind that some surveys only cover parts of the sky, so if you don't see anything, try zooming out.)
- If you know the Right Ascension and Declination of an object (J2000 epoch) enter them and click 'Go To' to move the centre of the field of view to that location.
- You can enter RA in sexagesimal format in the 'RA Hours/Degrees', 'Minutes' and 'Seconds' boxes and Dec in the 'Dec Degrees', 'Minutes' and 'Seconds' boxes.
- Alternatively you can enter RA and Dec in decimal degrees format in the 'RA Hours/Degrees' and 'Dec Degrees' boxes and have the toolbox attempt to convert from to degrees to sexagesimal. If so you must leave the 'Minutes' and 'Seconds' boxes blank otherwise the hours/degrees figures will be treated as sexagesimal.
- If you pan the view using the mouse, you can click the 'Get' button at any time to retrieve the current coordinates of the centre of the field of view.
- To share a single reticule with others, find your target and display the current field of view reticule as you wish to share it.
- Click the 'Create Link' button and a link will be generated in the 'Link' box.
- Select the entire link and copy it to create a bookmark, share it or post it to a forum. When you use the link, the imaging toolbox will be displayed with the existing settings. (In most browsers, clicking in the link box will automatically select the entire link. If not, ensure you select the entire link using Ctrl-A, Cmd-A, right-clicking and choosing 'Select All' or using a long press as appropriate to your device and browser).
- To save all reticules, click the 'Save Reticules' button. The entire set of reticules will be saved to your browser and re-loaded automatically when you next view the Imaging Toolbox. If the current set of reticules is unchanged since the last save, the button will display 'All Reticules Saved'. (Note that the reticules are saved to the current device and current browser only and will overwrite all previously saved reticules. You cannot transfer the saved reticules between devices, nor share them between different web browsers or user accounts on the same device and it is not currently possible to share them with others).
- Click the 'PNG Export' button to export the current view to a PNG file. A new browser tab or window will open automatically and display the current view as a PNG image. You can then right click on the image and select 'Save Image As..' (or equivalent) to save a copy of the image. (Note that these images are temporary and can't be shared/uploaded directly. Save them to your local device and then upload to a photo sharing site, social media or a forum).
- Select your camera model from the 'Camera' list. Many popular makes and models of astronomical CCD and DSLR cameras are listed. (Where a manufacturer sells multiple cameras with sensors that produce identical fields of view, they have been grouped together).
- Select your telescope from the 'Scope' list. Again, many makes and models popular with astro-imagers are listed. (Mainly GoTo scope/mount combinations and separate OTAs commonly used for imaging or guiding. Where a manufacturer sells the same OTA under different names they may have been grouped together in to a single entry).
- If you are using a Barlow lens or a Focal Reducer/Field Flattener, enter the effective magnification (greater than 1) or reduction factor (less than 1) in the 'Barlow/Reducer' box. If you aren't using a Barlow or Reducer, leave this box at the default value of 1. (Makes and models of Barlow and Reducer are not listed, since their effect depends on the spacing to the camera chip. The manufacturer's quoted magnification/reduction factor is a good starting place, but you may find that you have to adjust it slightly based on experience).
- The camera's pixel size, resolution and chip size will be retrieved and appear in the relevant boxes in the 'Chip Size' and 'Pixel Size' controls.
- The scope's focal length will be retrieved and appear in the 'Focal Length' box.
- The effective focal length of the scope will be calculated using the Barlow/Reducer factor, and will appear in the 'Effective Focal Length' boxes in all three sets of calculator controls.
- The field of view will be calculated and the reticle displayed using the 'Pixel Size' calculator controls (see below for details).
- If you wish to use the 'Chip Size' calculator controls instead, simply click the 'Calculate' button in that set of controls to have the reticule re-displayed. (Generally you should get the same results using either method. In a few cases the camera manufacturer's specifications for chip size, pixel size and resolution don't match, probably due to their technical writers not dealing with optical black areas of the chip consistently).
- The manufacturer name.
- The camera or scope model.
- For scopes, the aperture and focal length of the scope, both in mm.
- For cameras, the horizontal and vertical size of one pixel in µm, the horizontal and vertical size of the active imaging area of the chip in mm and the horizontal and vertical resolution of the active imaging area in pixels. Please try to exclude any inactive or optical black areas from the measurements. If you know the make and exact model number of the sensor chip, provide that as well.
- If possible, provide a link to the manufacturer's specification page or data sheet.
- Enter the size of one camera pixel in the 'Pixel Width' and 'Height' boxes in µm.
- Enter the horizontal and vertical resolution of the camera in the 'Resolution' boxes in pixels. (For the most accurate results, only include active pixels that appear in the image, leaving out any optical black area).
- Enter the effective focal length of your camera or lens in the 'Focal Length' box in mm. (The effective focal length is the focal length of the scope or lens multiplied by the magnification/reduction factor of any Barlow Lens or Focal Reducer that you are using).
- Enter the aperture of the scope in the 'Aperture' box in mm.
- Click the 'Calculate' button and the 'Reticule' controls will be updated and the reticule displayed automatically.
13. Chip Size: This set of controls allow you to calculate the field of view based on the size of the imaging chip as follows:
- Enter the width and height of the camera chip in the 'Chip Width' and 'Height' boxes. (For the most accurate results, only include the active imaging area, leaving out any optical black area).
- Enter the effective focal length of your camera or lens in the 'Focal Length' box in mm. (The effective focal length is the focal length of the scope or lens multiplied by the magnification/reduction factor of any Barlow Lens or Focal Reducer that you are using),
- Click the 'Calculate' button and the 'Reticule' controls will be updated and the reticule displayed automatically.
Limitations
The Imaging Toolbox has a number of limitations of which you should be aware:
- The Imaging Toolbox cannot determine whether you can reach focus with a given camera / Barlow / reducer / scope combination.
- Nor can it determine whether your scope will produce a flat field or a fully illuminated one across the width of a given camera sensor.
- You should conduct further research before committing to an expensive purchase, and no warranties are given or implied as to the accuracy of results or fitness for any particular purpose.
- The fields of view displayed are approximations only and may not match your equipment's field of view precisely. Aladin Lite uses a Sinusoidal Projection to display the sky survey, which works reasonably well for smaller fields of view of a few degrees (which is what you will obtain with a typical amateur camera and telescope).
- The projection method does not work so well for larger fields of view and thus zooming is limited to a maximum of 90 degrees when a reticule is displayed. (Note that it is possible to create reticules that span more than 90 degrees but these cannot be accommodated on screen).
- Distortions due to the projection method are particularly noticeable closer to the celestial poles even for small fields of view.
Basics: The Imaging Toolbox relies on Aladin Lite developed by CDS (Strasbourg - France). The Imaging Toolbox is not affiliated with or endorsed by CDS. Aladin Lite is still a beta service and no doubt bugs and compatibility will improve in later releases.
Browser: It requires a browser with full support for the HTML 5 Canvas object. In other words, you've reached the bleeding edge of web design and things are prone to fall over it from time to time.
Device: The Imaging Toolbox works best with a web browser window that is at least 1024 pixels wide. It offers experimental support for mobile devices, ideally with a window that is at least 480 pixels wide.
Plug-ins: JavaScript must be enabled in your browser, but you don't need any additional plug-ins or extensions.
Aladin Lite Compatibility: You should see a pretty picture of the Horsehead Nebula in the image canvas when you first load the page. If you see an empty blue space or parts of the image remain blocky / blurred, then your browser probably isn't compatible. This may only become noticeable as you pan or zoom the image (though it can can take a few seconds to download new image tiles as you move around).
Early testing indicates that panning and zooming of the Aladin Lite display on touch-screen devices may be rather hit and miss!
Testing: The results of compatibility testing for V0.5b are listed below. (Testing for V0.6b is under way but results are not yet in).
Browsers that have been fully tested by me and are known to work:
- Google Chrome 27 (Windows)
- Mozilla Firefox 21 (Windows)
- Safari 6.0.5 (Mac OS X)
- Mozilla Firefox 3.6.28 (Windows)
- Safari 6.0.4 (Mac OS X)
- Camino 2.1.2 (Mac OS X)
- SeaMonkey 2.9.1 (Linux)
- Kazehakase 0.5.8 (Linux)
- Iceape 2.7.12 (Linux)
- Luakit 1.8.0 (Linux)
- Iceweasel 10.0.12 (Linux)
- Microsoft Internet Explorer 9, 10 and 11 (on Windows)
- Opera 12.50 (Windows)
- SeaMonkey 2.7 (Windows)
- Mozilla Firefox 21.0 (Mac OS X)
- Google Chrome 27 (Linux)
- Mozilla Firefox 23 (Linux)
- Opera 12.02 (Linux)
- Rekonq 1.1 (Linux)
- Midori 0.4 (Linux)
- Epiphany 3.6.1 (Linux)
- Any browser which doesn't support HTML 5 Canvas (old ones generally!).
- Microsoft Internet Explorer 8 or earlier (Windows)
- Safari 4.07 (Windows)
- Arora 0.11.0 (Linux)
- Konqueror 4.9 (Linux)
- Dillo 3.0.2 (Linux)
Release Notes
V0.7b - Feburary 2014
- Third beta release.
- 604 telescope brand/models.
- 407 camera models.
- New in Aladin Lite:
- Now using Aladin Lite V2.
- Updated available surveys:
- Default survey is now main version of DSS Colour; any existing links referencing a removed survey will default to this.
- Backup DSS survey removed from options for simplicity.
- SDSS7 survey replaced with SDSS9 survey.
- New VTSS-Ha survey added.
- Better control of zooming/locking the field of view:
- Eliminated "bouncing" at maximum FOV.
- Elimated ineffcient redrawing to force a particular FOV when reticle maximised.
- Export view to PNG button added.
- New Features:
- Split in to separate HTML, CSS and JS files for performance and ease of maintenance:
- Can now add/change cameras and scopes without having to do a version release.
- Using arctan instead of small angle approximation to calculate reticule sizes.
- More accurate for big chips/short focal lengths, thus may result in *slightly* different results.
- The 'Link' box under 'Share and Save' automatically selects the whole URL text when clicked.
- Bug Fixes:
- None.
- Known Issues:
- Sometimes the toolbox will only partially initialise. The Aladin Lite survey, etc. will display and function as expected but the form controls for creating and managing reticules, etc. will not respond to clicks. This is being investigated; re-loading of the page usually clears the issue (sometimes it may be necessary to reload several times).
- The Aladin Lite Sinus projection is used by default. This can result in some distortion of the survey background when zooming at different scales, especially close to the celestial poles.
- Zooming limits only work if the current reticule is displayed, i.e. if other reticules are displayed but the current one is not, it is possible to zoom wider than 90 degrees, which may lead to erroneous display of the field of view in the other reticules at such large scales.
- Second beta release.
- 588 telescope brand/models.
- 383 camera models.
- New in Aladin Lite:
- Zoom in/out buttons.
- New Features:
- Experimental support for tablets/smartphones, Aladin Lite display re-sizes to fit narrower screens.
- Redesigned forms, better browser compatibility and flexible layout for mobile devices.
- Removed 'Simple Forms' option as hopefully no longer required due to new forms layout.
- Create and name multiple reticules and compare them on screen simultaneously.
- Label each reticule with a description.
- Save/load current set of reticules to browser local storage.
- Display and offset multiple reticules to plan a mosaic.
- Refactored code, more object orientation, doubtless new bugs to find.
- Bug Fixes:
- Limit Aladin Lite zoom to 90 degrees when a reticule is displayed to minimise scaling/projection issues.
- Known Issues:
- The Aladin Lite Sinus projection is used by default. This can result in some distortion of the survey background when zooming at different scales, especially close to the celestial poles.
- Zooming limits only work if the current reticule is displayed, i.e. if other reticules are displayed but the current one is not, it is possible to zoom wider than 90 degrees, which may lead to erroneous display of the field of view in the other reticules at such large scales.
- First beta release.
- 588 telescope brand/models.
- 382 camera models.
Aladin Lite developer here. I am currently adding new items to the javascript API and would be pleased to hear any suggestion you might have.
ReplyDeleteFeel free to contact me directly (see http://cdsweb.u-strasbg.fr/~boch/contact.html ).
Great post I would like to thank you for the efforts you have made in writing this interesting and knowledgeable article. https://toolboxwiki.com/
ReplyDelete