Saturday 21 December 2013

How to Interpret an Image Histogram

Sample Histogram
The Histogram
The histogram is probably the most important tool available in any astro-imaging application, both for capturing images and for processing them once captured. For those just starting out in astrophotography, the histogram is also one of the simplest but most frequently misunderstood tools.

In this short guide will explain the histogram; both what it means and how it can help you to make better images.

Friday 13 December 2013

Observatory Planning and German Equatorial Mounts

I am in the early stages of planning to build a pico-observatory for my imaging gear. My aim is to make it as small as possible in order to save cost and also to make it easy to build and maintain. There are a number of rough guides to building micro-observatories and pico-observatories on the web, but one key consideration seems to be glossed over in all of them. That is how to determine the space needed for the scope and German Equatorial Mount (GEM) to operate without colliding with the floor, walls or roof of the observatory.

As we will see, the calculations are relatively straightforward, but the slightly counter-intuitive nature of GEMs makes it tricky to figure them out from first principles. Following this guide, you can work it all out with a tape measure, paper and pencil and some string (option) in a couple of minutes flat. Read on for the solution.

Tuesday 12 November 2013

Western Veil (The Witch's Broom) - Unmodded DSLR Quickie

This is the Western part of the Veil Nebula (known as the Witch's Broom), a supernova remnant in the constellation of Cygnus. This image was taken on Sunday 10th November 2013). The seeing wasn't too great due to the jet stream, and I was battling the moon which was nearly half full and within 45 degrees of the target at a guess. This is an unmodified DSLR version, hence the relative lack of Red/Ha in the nebula.
The Witch's Broom Nebula (NGC 6960)

Tuesday 17 September 2013

PixInsight DSLR Workflow - Part 1a, Bias Frames

Andromeda Galaxy - M31
This is the first in a series of posts explaining the general workflow I follow when using PixInsight. We will be looking at my Andromeda image in this post but will bring in other images later. This is certainly not the ultimate workflow and there are some problems I have not resolved which I will point out along the way, but hopefully it will be of some help for fellow DSLR imagers in combating the rather noisy images that these uncooled cameras produce.

I undertake all of my processing in PixInsight (PI).  I am not 'anti-PhotoShop' and I know many great imagers use it for the processing, often in combination with other packages.  Personally I find PI suits my working style; as a computer scientist by training I like repeatable processes that I can analyse, refine and re-use in the future, and PI allows me to do this.  It does have a steep learning curve, but having spent about 300 hours using it over the past two years, including 200 hours of painstaking testing and learning on my Markarian's Chain image, I think I have started to get to grips with it.

Read on for Part 1 of my PixInsight DSLR workflow.

The Andromeda Galaxy - M31, M32 & M110

This is the Andromeda Galaxy, taken 14th/15th September 2013.  The image consists of 6 x 30 minute subexposures.  Read on below for technical details.


Andromeda Galaxy (M31)

Monday 9 September 2013

Imaging Toolbox Unavailable Morning of Friday 13th Sept 2013

Due to planned major electrical works at the CDS, all their services will be offline 08:00-12:00 CET on 13th September 2013. The Imaging Toolbox relies on Aladin Lite which is served up by the CDS, plus many of the sky surveys are also hosted by the CDS.

Service will resume automatically once the work is completed.

Saturday 7 September 2013

Widefield in the Virgo Cluster of Galaxies

Markarian's Chain (bottom left) plus M87, M89 and M90. This is a small part of the huge Virgo Cluster of galaxies. The image is composed of 81 ten minute exposures (13.5 hours) taken over nine nights between 1st April and 4th May 2013.
Markarian's Chain plus M87, M89 and M90.

Friday 26 July 2013

Imaging Toolbox Updates July 2013

A new update to the Imaging Toolbox has just been released with several great new features, including:

  • Create, name and display multiple reticules simultaneously to compare the fields of view of different camera and telescope / lens combinations. Great for evaluating prospective investments in new equipment!
  • Arrange multiple reticules by panning them horizontally and vertically.  Handy for planning a wide-field mosaic consisting of several image panes.
  • Save all existing reticules to your browser and reload them automatically on your next visit.
  • Experimental support for tablets/smartphones with a display that re-sizes to fit narrower screens.
Read on for more information.

Monday 1 July 2013

PHD Guiding Basic Use and Troubleshooting

[Article First Published on the Stargazer's Lounge forum]

Pleas for help with PHD Guiding seem to come up more often than almost other long-exposure imaging topic. I make no claims to be the ultimate expert on the subject, but I have travelled some way along the road from guiding failure to success, and so I thought it might be good to share a few pointers I've picked up along the way.

(By failure I mean I was getting one 1 minute exposure out of every five where the stars were slightly less egg-shaped than the rest. By success I mean I now discard one 10 minute exposure out of every thirty due to a guiding issue).

Firstly, I am going to cover the basics of a good guiding set-up, since many problems that are blamed on PHD are actually external issues related to the equipment being used or abused. After that I’ll take a look at how to diagnose and fix guiding problems with PHD.

Friday 7 June 2013

Imaging Toolbox Instructions

The imaging toolbox contains many features of use to the astro-imager, whether using your own equipment or a remote observatory, including:
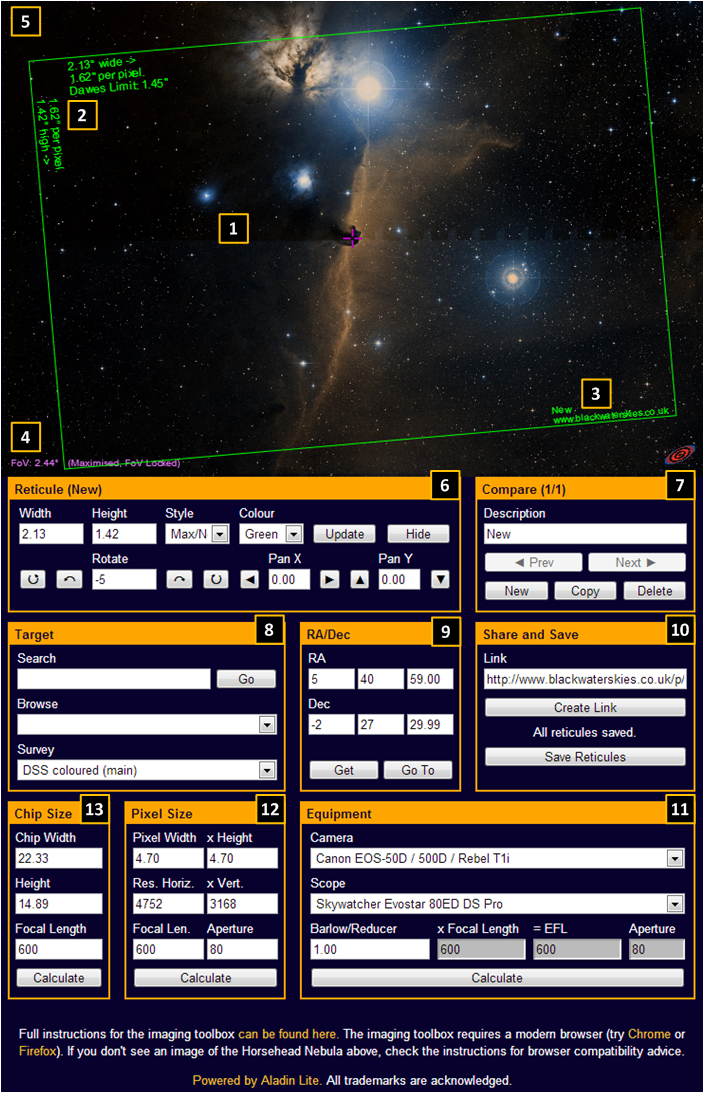
  • View a selection of all-sky image surveys directly from your web browser with no need to install extra software.
  • Explore the sky interactively by panning, zooming and dynamically switching between surveys.
  • Find almost any deep-sky target by common name or catalogue number (Messier, NGC, ICC, etc.), or choose from a list of popular imaging targets.
  • Go to any location using Right Ascension and Declination coordinates.
  • Overlay the sky with a reticule which reproduces the field of view of your camera and telescope / lens.
  • Display multiple reticules at once to compare the fields of view of different camera and telescope / lens combinations. Great for evaluating prospective investments in new equipment!
  • Reposition the target and rotate the reticule to work out the best way to frame your image, as well as changing the reticule colour to suit different sky backgrounds.
  • Arrange multiple reticules on a single target to plan a mosaic.
  • Annotate the reticule with the field of view dimensions, pixel scale and the resolving power of your scope/lens. 
  • Set the reticule size by directly entering the dimensions of your field of view if you already know them, or calculate them if you don't.
  • Calculate field of view dimensions using camera chip or pixel dimensions, resolution and the focal length of your scope or lens.
  • Or choose from a database of hundreds of popular telescopes, astronomical CCD and DSLR cameras.
  • Determine the effect of adding a Barlow lens or focal reducer/field flattener on your set-up.
Read on for full instructions.

Monday 13 May 2013

A Cheap Multi-Channel Dew Heater Controller

Following on from my post about DIY Nichrome Dew Heater Bands, I'm going to show you how to build a cheap and effective dew heater controller. Whilst preventing dew formation is essential to avoid interruptions to the night's imaging, we do not want to generate excessive heat as this can cause air currents in front of the telescope's optics and degrade the quality of the image.

A dew controller enables you to manage the power output of the heater bands, and also helps to conserve battery life if you are away from the mains supply. Commercial dew heater controllers retail for £70 to £100+, but I'll show you how to make a simple one for as little as £5. Please note that this device is suitable for heater bands at 12V to 24V only.


DIY Dew Heater Controller


Saturday 11 May 2013

Making Your Own Nichrome Dew Heater Bands

In my previous post about dew formation and prevention, I explained why dew forms on your imaging gear and outlined some simple strategies for combating it. Perhaps the most effective of these is to use a Dew Heater Band to keep your telescope optics just above the dew point.

There are many commercial suppliers of dew heater bands, but they tend to be rather expensive and range from £20 for a small eyepiece heater to £70 or more for a large band to heat a 36cm scope. Making your own dew heater band is a much cheaper option and for a few pounds in materials and a small amount of effort you can make one every bit as effective as a commercially bought model.
DIY dew heater bands (wrapped around the dew shields)


Tuesday 7 May 2013

Dew Formation and Prevention

Unless you are fortunate enough to do your imaging in a very dry environment, you will be all too familiar with the problem of dew forming on your telescope objective, corrector plate or camera lens. As an astro-imager who spends all his time ten metres above sea-level and within sight of the North Sea, dew used to interrupt proceedings far too often for my liking.

This post explains why dew forms and what we can do to delay or prevent it.